
When you're planning a tiling project, whether it's a bathroom renovation or kitchen backsplash, achieving perfectly straight lines and square corners isn't just about aesthetics: it's about professionalism. One seemingly crooked line can make an entire room look amateur, no matter how expensive your tiles are.
The 3/4/5 rule is a time-tested geometric method that professional tilers use to ensure every corner is exactly 90 degrees and every line runs perfectly true. Based on the Pythagorean theorem, this simple technique can transform your tiling project from good to exceptional.
At Swanbourne Construction Ltd, we've been using the 3/4/5 rule for years to deliver flawless tiling results across West Sussex. Whether you're a DIY enthusiast wanting to understand professional techniques or considering hiring contractors, understanding this fundamental principle will help you appreciate why precision matters in quality tilework.
Understanding the Mathematical Foundation
The 3/4/5 rule stems from one of mathematics' most famous equations: a² + b² = c². When you have a right triangle with sides measuring 3 units and 4 units, the hypotenuse (longest side) will always measure exactly 5 units.
This relationship holds true whether you're working in feet, metres, or any other unit of measurement. The beauty lies in its scalability: you can use 6/8/10, 9/12/15, or even 30/40/50 for larger spaces while maintaining the same geometric accuracy.
Why does this matter for tiling?
Most rooms aren't perfectly square, and walls aren't always straight. Without establishing true reference lines, your tiles will follow these imperfections, creating increasingly noticeable problems as the pattern develops. The 3/4/5 rule gives you mathematically perfect starting points that overcome these building irregularities.
Step-by-Step Application Process
Implementing the 3/4/5 rule requires careful measurement and marking. Here's how professional tilers apply this technique:
Step 1: Establish Your Baseline
Start by identifying the most important reference line in your room. This might be parallel to your main entrance, centred on a prominent wall, or aligned with key fixtures. Use a chalk line to mark this baseline clearly across the floor or wall surface.
Step 2: Mark Your First Measurement Point
Choose a strategic starting point on your baseline: often the room's centre or a prominent corner. From this point, measure exactly 3 feet (or your chosen unit) along the baseline and mark it clearly.
Step 3: Create the Perpendicular Line
From your original starting point, measure 4 feet at what appears to be a right angle to your baseline. Don't worry about perfect accuracy at this stage: you're about to verify and adjust.
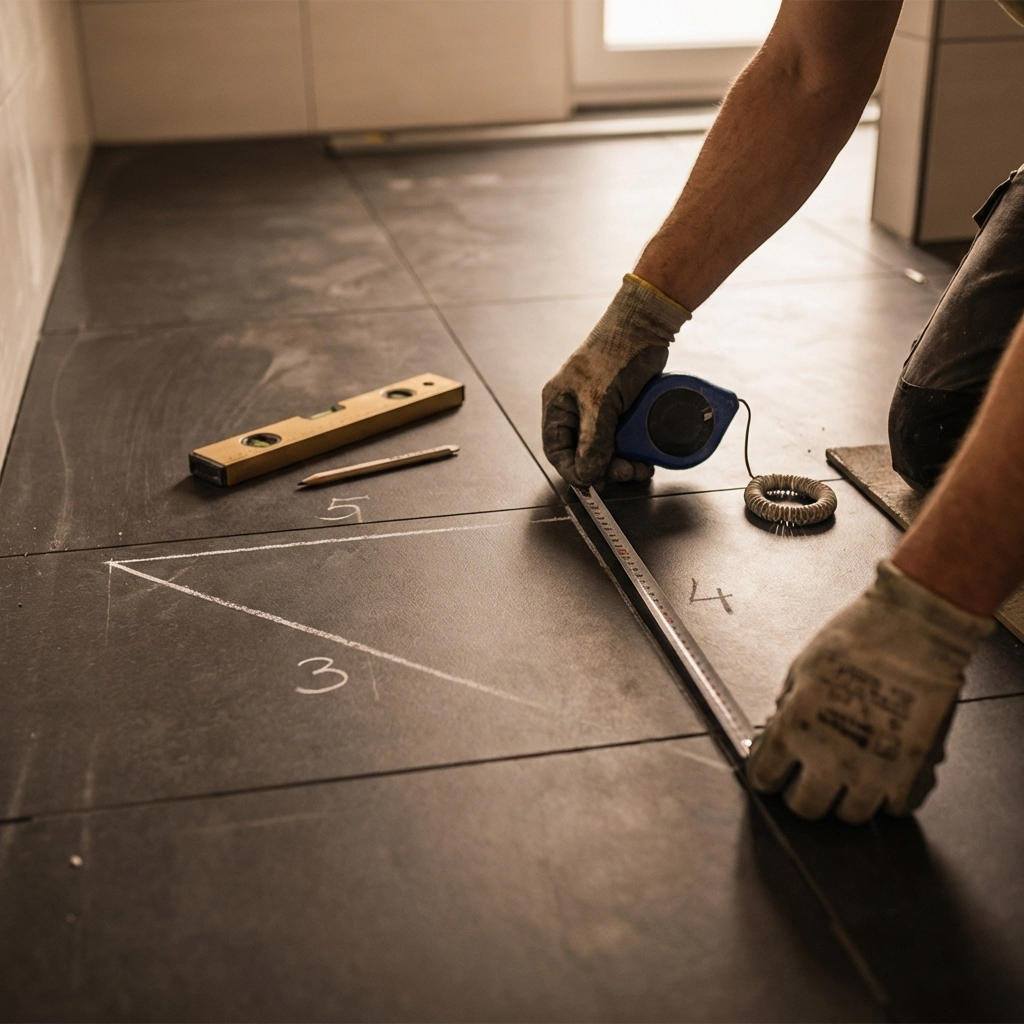
Step 4: Measure the Diagonal
Here's where the magic happens. Measure the distance between your 3-foot mark and your 4-foot mark. If your angle is truly square, this distance will measure exactly 5 feet.
Step 5: Adjust Until Perfect
If the diagonal measures more or less than 5 feet, adjust your 4-foot point until you achieve the perfect 5-foot measurement. This confirms your lines form a true 90-degree angle.
Step 6: Snap Your Grid Lines
Once verified, snap a permanent chalk line through your 4-foot point, perpendicular to your baseline. You now have two perfectly square reference lines to guide your entire tiling layout.
Why Precision Creates Professional Results
The difference between amateur and professional tiling often comes down to setup and planning. Experienced contractors understand that time spent establishing perfect reference lines saves hours of corrections later.
When tiles are laid following precise grid lines, several benefits emerge:
Consistent Spacing: Every tile sits in its mathematically correct position, creating uniform grout lines throughout the entire surface. This consistency is what separates professional installations from DIY attempts.
Reduced Waste: Accurate layouts minimize tile cuts and eliminate the need to replace incorrectly positioned tiles. Professional planning typically reduces material waste by 10-15%.
Enhanced Visual Appeal: Perfectly aligned tiles create clean sight lines that draw the eye naturally across the surface. Even small deviations become increasingly obvious as the pattern develops.
Future-Proofing: Precise installations accommodate furniture, fixtures, and fittings better, reducing the likelihood of awkward cuts around obstacles.
At Swanbourne Construction Ltd, we've seen how proper setup transforms both the installation process and final results. Our systematic approach ensures every project meets the exacting standards our clients expect.
Common Mistakes That Compromise Results
Even with understanding of the 3/4/5 rule, several common errors can undermine your tiling project:
Rushing the Setup Process
Many DIY enthusiasts are eager to start laying tiles and skip thorough measurement verification. This impatience often leads to compounding errors that become impossible to correct without starting over.
Ignoring Room Irregularities
Assuming existing walls and floors are square is perhaps the most costly mistake in tiling. Most buildings have minor imperfections that, while structurally insignificant, create major visual problems in finished tilework.
Inadequate Marking
Using temporary or unclear reference marks leads to confusion during installation. Professional tilers use bold, permanent chalk lines that remain visible throughout the entire project timeline.
Scaling Errors
When working in larger spaces, some tilers attempt to "eyeball" proportional increases rather than calculating exact multiples of the 3/4/5 relationship. This approach introduces cumulative errors that grow increasingly problematic.
Single Reference Point
Establishing only one square corner isn't sufficient for room-wide installations. Professional layouts require multiple verification points to ensure consistency across the entire surface.
Advanced Applications and Variations
The 3/4/5 rule extends beyond basic corner verification. Professional tilers employ several sophisticated applications:
Diagonal Layout Verification
When installing tiles diagonally, the rule helps establish the precise 45-degree angles necessary for professional results. This application is particularly critical in entrance areas and feature installations.
Multi-Room Continuity
For installations spanning multiple rooms, the rule ensures consistent alignment across doorways and transitions. This attention to detail creates seamless visual flow throughout connected spaces.
Curved and Irregular Surfaces
Even in bathrooms with curved shower areas or angled walls, the 3/4/5 rule provides reference points for managing transitions between different surface orientations.
When Professional Installation Makes Sense
While understanding the 3/4/5 rule helps appreciate quality workmanship, several factors suggest professional installation is the wisest investment:
Complex Layouts: Rooms with multiple angles, curved surfaces, or intricate patterns benefit from professional expertise and specialized tools.
Waterproofing Requirements: Bathroom and kitchen installations require precise waterproofing integration that's difficult to achieve without professional training.
Substrate Preparation: Uneven floors or walls require professional preparation techniques that go far beyond basic tile installation skills.
Material Investment: When using expensive tiles or creating permanent installations, professional workmanship protects your investment and ensures lasting results.
Time Constraints: Professional teams complete installations significantly faster while maintaining higher quality standards.
The experienced team at Swanbourne Construction Ltd combines technical expertise with quality materials to deliver exceptional results. Our systematic approach ensures every project begins with perfect reference lines and ends with flawless finishes.
The Foundation of Quality Tilework
Understanding the 3/4/5 rule reveals why professional tiling commands premium pricing: it's not just about laying tiles, but about creating mathematically perfect foundations that ensure lasting beauty and functionality.
Whether you're planning a bathroom renovation, kitchen upgrade, or any tiling project across West Sussex, remember that exceptional results begin with exceptional preparation. The few extra minutes spent verifying perfect squares and straight lines will pay dividends in professional-looking results that last for decades.
At Swanbourne Construction Ltd, we apply the 3/4/5 rule and dozens of other professional techniques to ensure every installation exceeds expectations. Our commitment to precision and quality has made us the trusted choice for discerning homeowners throughout the region.
Ready to discuss your tiling project? Contact Swanbourne Construction Ltd to discover how professional expertise and attention to detail can transform your space with flawless, lasting results.